Deploying Windows 7 + Office 2010 Using Microsoft Deployment Toolkit (MDT) 2010 – Part I
Other posts in this series:
Deploying Windows 7 + Office 2010 Using Microsoft Deployment Toolkit (MDT) 2010 – Part II
Deploying Windows 7 + Office 2010 Using Microsoft Deployment Toolkit (MDT) 2010 – Part III
I’ve started (finally!) re-editing a set of posts created a while ago: “Microsoft Deployment Toolkit 2010 Beta 1: Using MDT to Prepare, Install and Capture Customized Windows 7 Images”: Part I, Part II and Part III. Within those posts we had the chance to review some step-by-step procedures to create customized images of Windows 7, including Microsoft Office 2007 and achieve an automatic deployment; using always the Beta version of Microsoft Deployment Toolkit 2010.
Now we are going to evaluate some interesting step-by-step procedures for automated deployment of Windows 7 + Microsoft Office 2010 using Microsoft Deployment Toolkit (MDT) 2010.
The current version of this free deployment tool is Microsoft Deployment Toolkit 2010 with Update 1. This latest update brings some nice improvements:
- Comprehensive tools and guidance to efficiently manage large-scale deployments of Microsoft Office 2010.
- A new User-Driven Installation (UDI) deployment method that utilizes System Center Configuration Manager. UDI lets end users initiate and customize an OS deployment on their PCs—via an easy-to-use wizard.
- Automatically detects the true supported platforms for drivers, reducing deployment issues.
As in the previous set of posts, using the final and latest version of MDT 2010, we will use the Lite Touch Installation (LTI) for the deployment of Windows 7. For the Zero Touch Installation of Windows 7 we can use Microsoft Deployment Toolkit 2010 with System Center Configuration Manager 2007 R2 SP2.
Note: Only using SCCM 2007 with SP2 is the supported platform for deploying Windows 7; prior this release, the environment is not supported to use Configuration Manager Operating System Deployment (OSD).
What We Are Going To Do?
These posts will represent a step-by-step procedure for the following tasks:
- · Install and configure Microsoft Deployment Toolkit 2010 – Update 1.
- · Create a Task Sequence and deploy clean Windows 7 images.
- · Adding and configuring Microsoft Office 2010 in MDT 2010 for deployment.
- · Creating and capturing a reference image of Windows 7 and Microsoft Office 2010.
- · Automatic deployment of the customized Windows 7 images with Microsoft Office 2010 installed.
Requirements
Before starting with any procedure we need to review the requirements for the environment. In my case I’ll be using:
- Active Directory and DNS infrastructure working and operational.
- DHCP configured with Windows Deployment Services (WDS).
- Windows Deployment Services (WDS) configured.
- Windows 7 source files.
- Microsoft Office 2010 installation files.
Note: This previous post of mine shows how WDS must be configured to work together with DHCP.
As in software and features necessary:
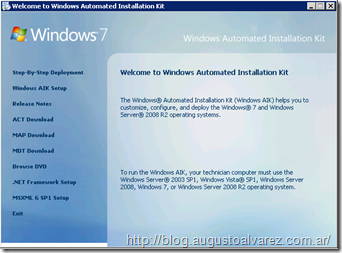
- Windows Automated Installation Kit (WAIK) 2.0. You can download it from here.
Note: The download page indicates that the WAIK version is “1”; but don’t worry, the actual version is 2.0.
- · MSXML 6.0.
- · PowerShell.
- · .Net Framework 3.5 SP1. Available for download here.
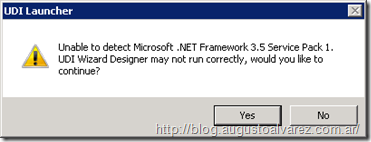
Note: Even though .Net Framework 2.5 SP1 is not a requirement for MDT 2010 installation; one of its features, User-Driven Installation (UDI), does requires the latest Microsoft Framework installed.
Here’s a message you will see when you try to run the UDI launcher:
MDT 2010 Installation
As for all the Microsoft Deployment Toolkit versions, the installation is a straight forward procedure: Just download, execute the installer and complete the installation wizard.
Once installed, we can access any of the components from the “Start Menu”.
One of the coolest options we can find in Microsoft Deployment Toolkit 2010 (and in most of Microsoft platforms) is the idea of designing the User Interface as places to find everything you need to know about what to do next.
“Getting Started”: All the steps involved to get MDT 2010 functional.
“Documentation”: All necessary links to start working with the tool.
Also another important section is “Components” where we can verify that all necessary requirements were installed (plus other optional installations).
Adding a Clean Image to MDT 2010
With the application installed, we can now start working directly with the operating system deployment. The configurations needed in MDT 2010 maintains as the Beta version and the older versions of the Deployment Toolkit.
The process is the following:
1. Create the distribution share.
2. Add operating system files to the distribution share.
3. Create a task sequence for the reference computer.
Creating the Distribution Share
1. In the MDT Console, right click on “Deployment Shares” and select “New Deployment Share”.
2. In the wizard, click on “Browse”.
3. Select a folder where you want to store all the binaries (applications, operating system, etc.) MDT will use. As a recommendation use a separate partition.
4. Click on “Next”.
5. Accept the name of the “Share Name” and click on “Next”.
6. In the next page we can add a short description for the distribution share. Click on “Next”.
7. Ensure that the option “Ask if an image should be captured” is checked and click on “Next”.
8. Another option we can select in this stage is if we are going to let users who are deploying an image can set the local administrator password. In large environment this is normally not recommended since not all users in charge of the deployment should be local administrators of the operating systems.
Click on “Next”.
9. Leave deselected also the option for “Ask user for a product key”. This option will be set in the task sequence of each operating system deployment. Click on “Next”.
10. Review the “Summary” page and click on “Next”.
11. Wait for the process to complete and click on “Finish”.
Once the process completes, we should see this in our MDT 2010 Management Console.
Adding Windows 7 Operating System
Once the deployment share is created, the next step is to add the files from the Windows 7 image. In my case I’ll be using a Windows 7 64bits image.
1. In “Deployment Shares”, expand the deployment share we’ve just created, right click “Operating Systems” and select “Import Operating System”.
2. Since this is a clean image from the Windows 7 media, select “Full set of source files” and click on “Next”.
3. I’m selecting the D:\ directory since I have attached the Windows 7 media in this drive. Click on “Next”.
4. Select the “Destination directory name” and click on “Next”.
5. In the “Summary” page click on “Next”.
6. Once the process is complete, click on “Finish”.
In my case, the images added will look like this in the MDT console.
Creating the Deployment Task Sequence
Now we have the distribution share with a clean image of Windows 7, we can create a task sequence to deploy the operating system.
1. In “Deployment Shares”, expand the deployment share created, right click “Task Sequences” and select “New Task Sequence”.
2. Insert a “Task Sequence ID”, I’m using “WIN7”. And a “Task Sequence name”, in my case “Deploy Windows 7 clean image”. Click on “Next”.
3. Accept the default option in “Template”: “Standard Client Task Sequence”. Click on “Next”.
4. Select the operating system to deploy. Since I have several options, I’ll be using “Windows 7 Professional”. Click on “Next”.
5. The “Product Key” section can be used to not specify a key at this point. Click on “Next”.
6. Complete the information about the registered user and click on “Next”.
7. In my case I’m also selecting the local Administrator password. Click on “Next”.
8. In the “Summary” page click on “Next”.
9. Once the process is complete we can click on “Finish”.
Note there’s an option of “View Script”, which we can use to retrieve an automated script to use for every time we want to create a similar Task Sequence (we only need to change the values used)
Once the Task Sequence is added, we should see something like this:
10. The process is completed once we update the Deployment Share. In the Deployment Share name, right click and select “Update Distribution Share”.
11. Leave selected the option for “Optimize the boot image updating process”. Click on “Next”.
12. Click on “Next” on “Summary”. This process can take a few minutes since it will be creating new files, including the boot images “LiteTouchPE_x86.iso” and “LiteTouchPE_x64” which can be used for the clean operating system deployment.
Within this process the Distribution Share is populated with several files which will be used in the operating system deployment. Even though we didn’t use the option, Microsoft Deployment Toolkit also includes the section for “Out-of-box Drivers”.
The drivers section includes a simple wizard where we can add device drivers into the operating system deployment. Using only the “.inf” files from these drivers, we can add the components directly; but always remember to use the “Update Distribution Share” once those are added; with that the drivers are injected automatically.
In the next post we will add Microsoft Office 2010 to MDT 2010, the Task Sequence involved and configuring this application for a silent install.
Stay tuned!
Other posts in this series:
Deploying Windows 7 + Office 2010 Using Microsoft Deployment Toolkit (MDT) 2010 – Part II
Deploying Windows 7 + Office 2010 Using Microsoft Deployment Toolkit (MDT) 2010 – Part III
Categories: Deployment, Microsoft Deployment Toolkit (MDT), Windows 7


![clip_image001[1] clip_image001[1]](https://augustoalvarez.files.wordpress.com/2010/07/clip_image0011_thumb.png?w=340&h=264)
![clip_image001[3] clip_image001[3]](https://augustoalvarez.files.wordpress.com/2010/07/clip_image0013_thumb.png?w=268&h=360)
![clip_image001[5] clip_image001[5]](https://augustoalvarez.files.wordpress.com/2010/07/clip_image0015_thumb.png?w=414&h=310)
![clip_image001[7] clip_image001[7]](https://augustoalvarez.files.wordpress.com/2010/07/clip_image0017_thumb.png?w=420&h=186)
![clip_image001[9] clip_image001[9]](https://augustoalvarez.files.wordpress.com/2010/07/clip_image0019_thumb.png?w=438&h=216)
![clip_image001[11] clip_image001[11]](https://augustoalvarez.files.wordpress.com/2010/07/clip_image00111_thumb.png?w=261&h=279)
![clip_image001[13] clip_image001[13]](https://augustoalvarez.files.wordpress.com/2010/07/clip_image00113_thumb.png?w=282&h=274)
![clip_image001[15] clip_image001[15]](https://augustoalvarez.files.wordpress.com/2010/07/clip_image00115_thumb.png?w=368&h=303)
![clip_image001[17] clip_image001[17]](https://augustoalvarez.files.wordpress.com/2010/07/clip_image00117_thumb.png?w=367&h=302)
![clip_image001[19] clip_image001[19]](https://augustoalvarez.files.wordpress.com/2010/07/clip_image00119_thumb.png?w=367&h=302)
![clip_image001[21] clip_image001[21]](https://augustoalvarez.files.wordpress.com/2010/07/clip_image00121_thumb.png?w=374&h=308)
![clip_image001[23] clip_image001[23]](https://augustoalvarez.files.wordpress.com/2010/07/clip_image00123_thumb.png?w=380&h=313)
![clip_image001[25] clip_image001[25]](https://augustoalvarez.files.wordpress.com/2010/07/clip_image00125_thumb.png?w=386&h=318)
![clip_image001[27] clip_image001[27]](https://augustoalvarez.files.wordpress.com/2010/07/clip_image00127_thumb.png?w=377&h=319)
![clip_image001[29] clip_image001[29]](https://augustoalvarez.files.wordpress.com/2010/07/clip_image00129_thumb.png?w=312&h=270)
![clip_image001[33] clip_image001[33]](https://augustoalvarez.files.wordpress.com/2010/07/clip_image00133_thumb.png?w=375&h=309)
![clip_image001[31] clip_image001[31]](https://augustoalvarez.files.wordpress.com/2010/07/clip_image00131_thumb.png?w=380&h=313)
![clip_image001[35] clip_image001[35]](https://augustoalvarez.files.wordpress.com/2010/07/clip_image00135_thumb.png?w=383&h=314)
![clip_image001[37] clip_image001[37]](https://augustoalvarez.files.wordpress.com/2010/07/clip_image00137_thumb.png?w=387&h=318)
![clip_image001[39] clip_image001[39]](https://augustoalvarez.files.wordpress.com/2010/07/clip_image00139_thumb.png?w=416&h=52)
![clip_image001[41] clip_image001[41]](https://augustoalvarez.files.wordpress.com/2010/07/clip_image00141_thumb.png?w=275&h=314)
![clip_image001[45] clip_image001[45]](https://augustoalvarez.files.wordpress.com/2010/07/clip_image00145_thumb.png?w=398&h=327)
![clip_image001[47] clip_image001[47]](https://augustoalvarez.files.wordpress.com/2010/07/clip_image00147_thumb.png?w=396&h=326)
![clip_image001[49] clip_image001[49]](https://augustoalvarez.files.wordpress.com/2010/07/clip_image00149_thumb.png?w=403&h=332)
![clip_image001[51] clip_image001[51]](https://augustoalvarez.files.wordpress.com/2010/07/clip_image00151_thumb.png?w=402&h=331)
![clip_image001[53] clip_image001[53]](https://augustoalvarez.files.wordpress.com/2010/07/clip_image00153_thumb.png?w=405&h=333)
![clip_image001[55] clip_image001[55]](https://augustoalvarez.files.wordpress.com/2010/07/clip_image00155_thumb.png?w=407&h=335)
![clip_image001[59] clip_image001[59]](https://augustoalvarez.files.wordpress.com/2010/07/clip_image00159_thumb.png?w=410&h=336)
![clip_image001[61] clip_image001[61]](https://augustoalvarez.files.wordpress.com/2010/07/clip_image00161_thumb.png?w=387&h=264)
![clip_image001[63] clip_image001[63]](https://augustoalvarez.files.wordpress.com/2010/07/clip_image00163_thumb.png?w=388&h=319)
![clip_image001[65] clip_image001[65]](https://augustoalvarez.files.wordpress.com/2010/07/clip_image00165_thumb.png?w=390&h=321)


I’ve recently started a blog, the information you provide on this site has helped me tremendously. Thank you for all of your time & work.
This article is really awesome. Thanks for your tremendous article.
Now I am learning Windows 7. This indeed helped me a lot.
Great blog, been a great help. Thank you!
excellent post…thanks for posting this…topic
Very Helpful
thank you verymuch
Microsroft Office is still the best program when it comes to spreadsheet and word processing`”~
Great post, thank you for the info. Learning new things everyday!
Deploying Windows 7 + Office 2010 Using Microsoft Deployment Toolkit (MDT) 2010 is a very informative has been very helpful to me as I want to deploy win7 & office 2010 proplus in the school where I work. I have a some problems though which relate to permissions and I think ports:
1) When the deployment finishes and a teacher logs on a dialog box pops up to setup office updates, this can’t be done by them or students because admin rights are required to make the change. Is this because I hadn’t configured automatic updates before capturing the image as a GPO policy had it greyed out?
2) Outlook asks for permission to change some settings in the Firewall, presumably ports although not totally sure. How can I make these things happen without any user intervention? I should add that I used the Config.xml file simlar to yours and the Office Customization Tool to set the shortcuts, outlook profile path for exchange, and selected KMS for the office key.
Found you blog via aol I have to admit I m amazed with all your blogposts!
The post is really very good.Thank you very much & keep posting.
Thanks!
estupendo muchas gracias por el post