Windows Embedded Standard 2009 Step-by-Step Deployment – Part III
Check also:
Windows Embedded Standard 2009 Step-by-Step Deployment – Part I
Windows Embedded Standard 2009 Step-by-Step Deployment – Part II
After reviewing the necessary steps for preparing our environment (Post I) and building a custom image for a thin client (Post II); we’ll prepare the remote boot process as well as the remote boot server that will deploy that image on diskless devices.
If you prepared the same environment with the XP Embedded version, the process does not have much differences.
1. Set the Image Ready
Even though the building process of the image is complete, we need to run a few steps to set the image ready for deployment.
The First Boot Agent (FBA) needs to be executed one time to complete this process. By booting the image one time, the FBA makes a hardware detection and finishing some other tasks like network configuration. Also, these tasks executed by the agent can be customized; check this link about FBA.
The image is already built, so we are going to take those files to a new disk (virtual in my case) and boot a client machine from there.
1.1 Add a second disk to the machine acting as Remote Boot Server. Create a new partition and set it to “Active”.

1.2 Copy the image files to that new logical disk.

1.3 Like I said, I’m using a virtual environment, so my next step would be to create a new virtual machine, attach the virtual hard disk as primary and start the virtual machine.

Since FBA contains several tasks to execute, could take a few moments to complete.
Soon as it completes, this message should appear: “Machine Released! Click to shutdown or reboot.”.

1.4 Select “Shutdown”. And I bet the next window will get you back some good old memories :)

Here comes an important note if you are planning a remote boot environment:
Since we’ve added the “System Cloning Tool” component and the image task sequences are now complete, every time this image is now booted will generate a new computer name, SID and other tasks that the fbreseal process executes to guarantee that there’ll be no cloned images on your environment. Quite similar as the sysprep process.
And it means that this image cannot be booted any more, otherwise the fbreseal process will be lost for next deployments.
1.5 Now you can attach the virtual disk back to the Windows Embedded remote boot server.
2. SDI Loader
The Storage Device Image Loader will be in charge of emulating those set of files to act as booteable storage for your clients.
2.1 Open SDI Loader from Windows Embedded Studio.

2.2 Click “Yes” to install the SDI Driver.

2.3 Click on “Add Disk” to generate a new .sdi file where the image will be stored.

2.4 Choose name and location for the file.

2.5 Choose the size of the file. This .sdi file should be, at least, 25% bigger than the image size.

Once it’s selected, the new device is added to SDI Loader and to your operating system as a new drive.

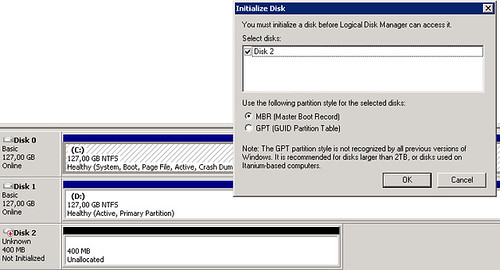
2.6 Open “Disk Management” to prepare the new virtual drive added to the system. Initialize disk.
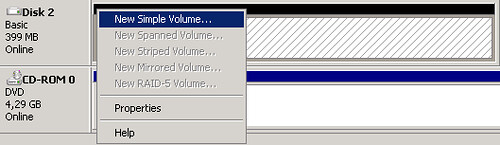
2.7 Prepare the new volume following the wizard selecting it as “Primary Partition”.
2.8 Copy the image files (from the virtual disk that was used to boot one time) to the new virtual partition.

3. SDI Manager
Ok, now it is time to use some of options from the SDI Manager, that let us handle offline .sdi files.
We will generate a new SDI file that “Remote Boot Manager” will use to deploy on remote devices and machines.
3.1 Open a “cmd” and locate Windows Embedded Utilities “C:\Program Files\Windows Embedded\utilities”.

3.2 Create a new .sdi file using “SDImgr.wsf: cscript SDImgr.wsd /new c:\ramdisk.sdi”

With the new file created, the next step is to read the image files located in the virtual partition (in my case, this partition is associated with the F:\ drive) to complete the process.
3.3 From “cmd” run: “cscript SDImgr.wsf c:\ramdisk.sdi /readpart:F:”

64bits Operating System Issue
The SDI driver has an issue if you are using x64 operating system, like Windows Server 2008. If you try running any of the SDI Manager options, like the ones mentioned above, you will see this error:
“ActiveX component can’t create object: ‘SDIAUT.SDI’”

Even though the script used by x86 and x64 operating systems is the same, on a 32bit environment you won’t see this issue.
4. Configuring Remote Boot Manager
Remote Boot Manager and the DHCP role configured earlier, will be in charge of answering remote and diskless clients with the proper boot image.
4.1 Place the “ramdisk.sdi” file configured earlier inside this folder “C:\Program Files\Windows Embedded\Remote Boot Service\Downloads”.

4.2 Open "Remote Boot Manager” from Windows Embedded Studio.

4.3 Click “Yes” to create a new configuration file.

Once the Remote Boot Manager window opens, you need to add each client device or machine with their specific MAC Address. For that, we’ll take a look at the virtual machine client’s configuration.
4.4 To achieve booting from the network when you are using Hyper-V, you need to add a “Legacy Network Adapter” on the client machine and specify an static MAC Address.
4.5 With that, you are ready to complete the data from Remote Boot Manager.

Client MAC Address: Assigned statically.
Description: (optional).
Boot Server: Default value (0.0.0.0) to select local machine.
Boot Program: startrom.n12. This program will request F12 confirmation for booting from the network. You can also select startrom to access directly to the boot image without requiring confirmation.
Boot Image: ramdisk.sdi. Remember that the image should be placed inside “C:\Program Files\Windows Embedded\Remote Boot Service\Downloads”.
Boot Parameters: (optional).

Now your environment is set to go.
Make sure that your client machine has the correct configuration to boot from the network.

Loading the image remotely.

Windows Embedded image booting.

Desktop ready for use.

Enjoy!
Check also:
Windows Embedded Standard 2009 Step-by-Step Deployment – Part I
Windows Embedded Standard 2009 Step-by-Step Deployment – Part II
Cheers!
Categories: Windows Embedded, Windows Embedded 2009


Hi, I am having a problem on the workstation diskless PXE. I have been through all the steps on the Windows Embedded Standard 2009 Step-by-Step Deployment – Part III. Where is the message the problem is my workstation at the messages “Windows could not start due to error while booting from a RAMDISK Windows failed to open the RAMDISK image”.
How the improvement to my case?
Hello azibach,
That error appears when the image on the server cannot be located. More info here: http://msdn.microsoft.com/en-us/library/ms838569(WinEmbedded.5).aspx
Check the file locations of the image you created, remember that must be stored in the specified directory in the post.
Hope it helps,
Cheers!
Augusto
Thanks for the answer, but I have been laying ramdisk.sdi this file in the directory C:\Program Files\Windows Embedded\Remote Boot Service\Downloads, in accordance with the step 4.1 of the article you.
oh ya, this is some pictures of my system
Thank you for your.
Hello azibach,
Ok I see what might be the problem there. The SDI file is larger that 500mb and the NTLDR included does not support images with that size.
Try building an image with less than 500mbs and the error should dissappear.
If you cannot shrink any more that image, I think there are some resources in the web that can give you a workaround for the large images.
Hope it helps,
Cheers!
Augusto
Thank you. I have successfully build a diskless or remotebook in workstation. oh yah, one more question, how do you monitor display settings / vga 800×600 automatically when the workstation is running?
Cheers!
abizach
Sorry my previous question with regard to setting up displays of 800×600, this is I find the solution.
Currently I’m working so Diskless or Remoteboot Windows Embedded Workstation this can be used to communicate with the Citrix Server, I have been trying to install a citrix client on this workstation with the ica32.exe files Client for 32-bit Windows
but failed (the installation can not run).
How to file for citrix client this workstation and how to do installation? Thanks.
Cheers!
abizach
Hi
Can you tell me how to create and view event log from target designer?
That is really great source, Thank you…
Great, Thanks
Dear all
i facing 1 problem, i had success go through part 1 and 2, but when in part 3. i have use a second hdd and format it and set it to active and copy all my file to it. and i take the second hdd boot in another pc. but i get this error
————————————————————
Windows could not start because of a computer disk hardware configuration problem.
Could not read from the selected boot disk. Check boot path and disk hardware.
Please check the Windows documentation about hardware disk configuration and your hardware reference mamuals for additional information.
————————————————————
Can someone help me about this problem. thanks alot
Dear all
i facing 1 problem, i had success go through part 1 and 2, but when in part 3. i have use a second hdd and format it and set it to active and copy all my file to it. and i take the second hdd boot in another pc. but i get this error
————————————————————
Windows could not start because of a computer disk hardware configuration problem.
Could not read from the selected boot disk. Check boot path and disk hardware.
Please check the Windows documentation about hardware disk configuration and your hardware reference mamuals for additional information.
————————————————————
how can i solve this problem?
Thanks
Hello Hong,
Are you using a SATA hard drive? do you have the drivers regarding to that device?
Cheers,
Augusto
i try to use PATA hdd and vmware esxi test.
The error show
——————————————-
Windows could not start because of a computer disk hardware configuration problem.
Could not read from the selected boot disk. Check boot path and disk hardware.
Please check the Windows documentation about hardware disk configuration and your hardware reference mamuals for additional information.
—————————————-
is when i try to use at vmware esxi.
When i try to use PATA hdd. It show nothing, is this the driver problem?
cause i am first time using the windows embedded standard, i not familiar with the configuration. What driver i need to add in and how?
Thanks for your reply
Dear Augusto Alvarez
My situation is like this, i having a thin client device. running VIA processor. 1gb ram, 1 compact flash card(4gb), VGA output, 4 USB port. i would like to develop a small windows to let it run ony Internet Explorer and Remote Desktop Connection. So how can i develop and install this Windows into the thin client.
Thanks
Thanks a million for this walkthrough! It has by far been the largest source of information for the project I’m working on.
I found a workaround to the 64 bit issue with SDIMgr. For those running a 64 bit OS, when using SDIMgr, open %windir%\SysWOW64\cmd.exe (as an administrator) and kick off your ‘cscript sdimgr.wsf /blah’ from there.
Works like a charm!
Thanks again,
Keith
Thanks Keith!
And good to know that the information helped you.
Cheers!
Augusto
Another solution to this problem is to explicitly invoke %windir%\SysWOW64\cscript.exe SDIMgr.wsf %1 %2 %3
By default, 64-bit windows will invoke 64-bit wscript, and WES2009 utilities are 32-bit.
I’d like to thank you for this very helpful walk-through – it’s a lot easier to understand than the WES documentation. FYI, I was struggling with the 500MB partition limit.
Hi,
I build one image successfully. And how to test the image and how to boot from the image.
Hello Srinivas,
After the process is complete, take the files into a machine where you can boot the image. Or you can try the RAM boot shown in the articles.
Best regards
Augusto
Sir,
We have built image on normal desktop.
Instead of Hyper-v i would like with vmware or another machine. Please suggest an solution.
Hello Augusto,
I have a question. I want to deploy this image to one thinclient possibly via USB. From there I would like to take a wim and add it to the SCCM server. Is this possible and how can I do it?
Hello Robin,
There are some guidelines for both scenarios: “Booting Windows Embedded Standard from USB” http://msdn.microsoft.com/en-us/library/bb499354(v=winembedded.51).aspx
“Deploying Images in Windows Embedded” http://msdn.microsoft.com/en-us/library/ff794231(v=winembedded.60).aspx
Hope it helps,
Augusto
Good day,
i have a thin client of 64mb hard disk drive, and 512 ram and i want to install wiindow xp on it pls help with software to use